Shrink A Partition In Windows 7 & Vista
How To Shrink A Partition In Windows 7 and Windows Vista - Overview
Both Windows 7 and Windows Vista include a built in drive management shrink volume feature that allows you to quite easily shrink or expand a hard drive partition. In the past this functionality was only possible via 3rd party tools.
Having the ability to shrink a partition (volume) can be very handy in certain situations. “E.g.” your existing hard drive is formatted to capacity and you would like to create another drive letter (volume/partition) to better manage your data.
The Windows shrink volume feature works fairly quite well and it is definitely a welcoming addition in both operating systems though it is worth noting that the Windows 7 shrink volume tool works a bit better than it does in Windows Vista.
In this tutorial we will walk you step by step through the process of shrinking a volume in Windows 7 and Windows Vista. Before you use this tutorial we highly recommend you backup your existing data for there is always a risk of data loss. While the risk is fairly small, anytime you tweak a hard drive volume it never hurts to backup your existing data as a precaution.
Note: The terms volume and partition are used interchangeably throughout this tutorial.
Step by step guide to shrink a partition in Windows 7 and Windows Vista.
How To Shrink a Partition Step by Step:
Step 1:
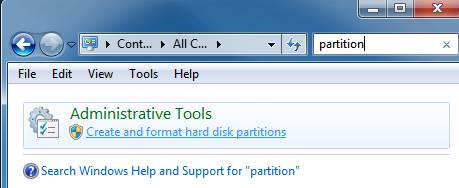
To access the shrink volume utility open up Control Panel and then type the word partition into the search box, then click `Create and format hard disk partitions’ from the search result. Additionally, you can right-click on Computer on your start menu or desktop and then select Manage from the options presented. Once in the Computer Management Console select Disk Management under the storage section on the left hand pane.
Step 2:
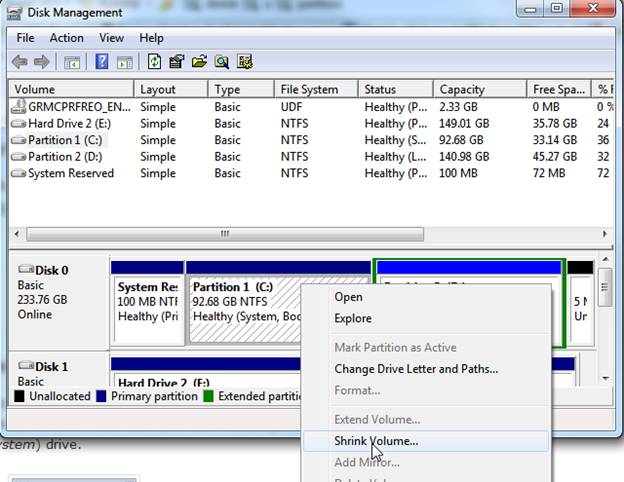
In the Disk Management window simply right-click the partition that you’d like to shrink and then choose Shrink Volume from the options menu.
Step 3:
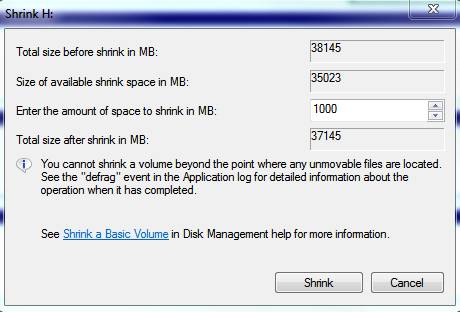
Now enter the amount of space (in MB) that you want to shrink the volume by. Make sure you leave extra space if this is your C: (system) drive. Remember you are entering the size you want to shrink the volume, not the drives new size. (“E.g.” If you have a 40GB drive and you would like to shrink it 1GB simply enter 1000 into the box. At the end of the shrink volume process you will have a 39GB partition in addition to the newly created 1GB partition.)
Note: Disk size various so 40GB isn’t necessarily 40GB. For example our 40GB test drive used in this guide only formats with a capacity of 38,145MB as you see in the screenshot.
Step 4:
Once satisfied with your choices simply click the Shrink button to begin the shrinking process. Once the partition has finished shrinking you will then have unallocated space available in which you can begin creating and formatting a new partition. Before you have access to a new drive letter you must create a partition and format the unallocated space made available after the shrinking process completed. See Formatting A Hard Drive In Windows 7 guide for details on Windows 7 formatting.

Shrink A Partition Guide Conclusion:
We hope you found our shrink a partition guide useful, please feel free to Ask The Computer Tech anytime if you have any questions or concerns with any of the steps in this guide.
Learn How To Extend a Partition in Windows 7 & Vista
As an added bonus to the shrink a partition steps in this guide, here is how you can extend a partition, useful in those situations where you want to revert a shrink a partition process or even increase the current size of an existing partition. Enjoy!
How To Extend a partition step by step:
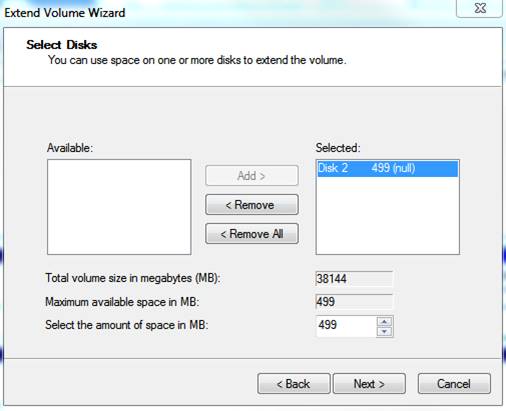
In the Disk Management screen right-click on the partition that you want to extend, select “Extend Volume” from the menu, and then specify the amount that you want to increase the partition by.
Note: You can only extend a partition/volume if there is existing unallocated space on the hard drive. If there is no unallocated space available, you will have to delete another volume in order to extend a partition.
See also:
Return
from Shrink a Partition In Windows 7 & Vista to Home Page
Contact us
| 