An Illustrated Guide to Installing Laptop Memory
Difficulty: Easy
Time: 10-15 Minutes
Tools: Small Philips Screwdriver
Installing Laptop Memory Overview
In this guide we will be illustrating how to install memory into a laptop computer within about 15 minutes. Installing laptop memory is fairly straight forward, and most laptops have a simple memory compartment which you can access with a small phillips head screw driver.
This guide assumes you already have memory in hand, however if you have not already purchased memory, you will need to gather a bit of information regarding your specific laptop before you can purchase the right memory.
Gathering your laptop model number, speed and type of memory, how much memory your laptop currently has installed, and how much memory your laptop can be upgraded to can typically be found in your laptops documentation, or if needed the laptop manufacturers website.
Another place to gather memory configuration information about a specific laptop model is to head on over to Crucial’s (www.crucial.com) website and use their Memory Advisor tool. Their Memory Advisor tool will walk you step-by-step through selecting the correct laptop memory for your laptop and they also has a scanner tool option which scans your system.
The Memory Advisor tool works well and it shows how many memory slots are available, the maximum amount that your laptop accepts, and also memory speed among other details.
Installing Laptop Memory - Pre Installation Notes
Once you've purcahsed the correct memory and are ready to perform the upgrade, go ahead and get yourself a small Phillips screwdriver for it will be the only tool needed during installation.
Installing Laptop Memory - Illustrated guide
Step 1:
Turn off the computer, remove all power cords, and finally take out the battery. Batteries are typically removed using a small mechanical switch. Push the switch in the proper direction and simply pull the battery out.
Step 2:
Locate the small panel on the bottom of the laptop concealing the memory modules. Most manufacturers make it easy to find the memory module locations. Often you will see a tiny “M” or other illustration next to the panel. If necessary you can always reference the manual.
Note: Keep in mind when installing laptop memory that some laptops have memory modules in other locations like under the keyboard for example. Unfortunately we aren’t covering this type of installation in this guide because it is slightly more complex and specific to each laptop. However, please don’t hesitate to contact us if you’d like some free advice.
Step 3:
Remove the small screws holding the panel in place and then put panel and screws aside in a safe place so you don’t lose them.
Step 4:
When installing laptop memory you may need to take out an existing module to make room.
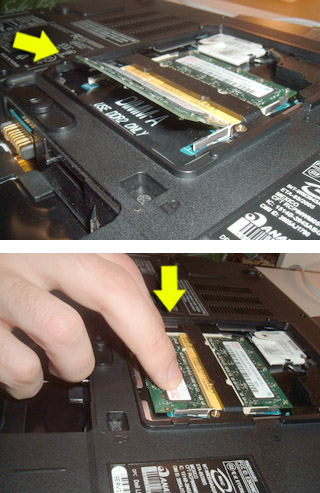
To remove existing modules find the small clamps on each side of the module and gently move them both outwards from the memory module slightly until the module pops up at about a 40-degree angle.
If you are unsure at this point simply take a breath and briefly study things until the picture comes together. The clamp mechanism is actually rather simple.
Once the memory module is at the 40-degree angle you simply pull it out at the same angle gently.
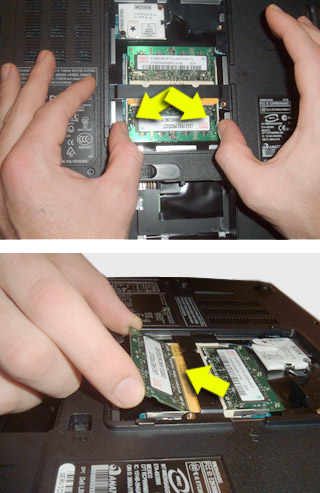
Step 5:
To install simply align the notch of the memory module with the memory slot and gently push the module into the slot at a 40-degree angle, and once you can see that the pins are in the slot gently rotate the module down flat until the clamps lock it in place. That’s it, easy right?
Step 6:
Replace the memory panel securing it with the screws, pop the laptop battery back in place, and finally plug in the laptop.
Great job you’re almost done.
Installing Laptop Memory - Post Installation Notes
After you've performed the physical installation the next step is to boot your computer to determine if the upgrade was successful and verify that your system does indeed recognize the new module.
Depending on your specific laptop, you may see a similar message such as “Your system memory size has changed” once you turn it on.
You may need to press an F1 or other key to continue when prompted but that’s usually about all there is to installing laptop memory.
See also:
Return
from Installing Laptop Memory to Home Page
Contact us | View site map
| 