Windows 7 Installation Guide
Windows 7 Installation Guide Overview
In this guide we are going to show you Windows 7 installation options, where to purcahse Windows 7, how to prepare for installing Windows 7, how to install Windows 7 using the upgrade option, how to install windows 7 via the custom installation option with and without formating your hard drive, and how to install Windows 7 when no existing operating system is installed.
Windows 7 Installation Options:
When installing Windows 7 you are going to have two options to choose from during the Windows 7 installation process including an upgrade or custom option. Your first step should be to determine which option is right for you.
Upgrade Option:
The upgrade route will allow you to replace your current version of Windows with Windows 7. This route will pretty much transfer over existing operating systems files, settings, and all currently installed programs.
Custom Option:
The custom option completely replaces your current version of Windows with Windows 7 however it does not preserve your files, settings, or programs as the upgrade option does. Often a custom option install is referred to as clean installation because of this.
In our opinion the custom option is often the best route to take for we personally feel it is better to pull crucial data off an existing system, for example a Windows Vista system to an external backup and then perform a clean/custom install of Windows 7 instead of an upgrade.
While this may not be as fast in some situations as an upgrade, a clean install prevents you from transferring potentially corrupt software, viruses, etc. to the fresh Windows 7 installation. On top of this it is just simply better to have a clean install, for this is a great time to tidy your system up and install fresh software along with the fresh Windows 7 operating system.
Choose Topic:
Microsoft Windows 7 Purchasing Options:
Before beginning a Windows 7 installation you will of course need to purchase/obtain the operating system installation media. One great place to pick up a copy of the Windows 7 OS is your favorite local retailer such as Best Buy, Staples, Office Depot, etc. Or browse over to your favorite online retailer such as Amazon, Newegg, etc. or even purchase a CD from Microsoft's online store. Prices are pretty consistent across the board.
Another option is to purchase but download Windows 7 online direct from Microsoft. This is a great way to install Windows 7 on a laptop for example that lacks a DVD/CD drive such as many of today’s super compact laptops or netbook style laptops. This option will also allow you go start using Windows 7 right away. Here is a link to Microsoft’s own web store: http://windows.microsoft.com/en-US/windows/shop
When you purchase Windows 7 from a retail outlet the installation disc actually includes both 32 and 64-bit versions of the Windows 7 operating system. This gives you flexibility if your hardware supports 64 bit operating systems. Typically if your system has more than 4GB of memory 64-bit is going to be your choice for 32-bit Windows operating systems cap off at 4GB of memory.
On the other hand purchasing and downloading Windows 7 from the Microsoft store will require you to choose either the 32-bit or the 64-bit version for download.
Windows 7 Upgrade License vs Full Version License
Full Version:
- Windows 7 comes in two flavors, either upgrade or full. The full version is slightly more expensive but it is required if you want to install Windows 7 on a PC without an existing Windows operating system and the upgrade version while cheaper is only for those systems with an already installed OS. Check out the Upgrading Windows 7 FAQ to further fine tune which version is right for you.
Upgrade:
- Purchasing the Windows 7 upgrade version is great for those of you who have an existing Windows Operating system already installed and for those who want to save a little money since it is a bit cheaper.
The upgrade version of Windows 7 can be installed on a computer with Windows XP or Windows Vista however only Windows Vista can take a true upgrade where it preserves your files, settings, etc. When using an upgrade version of Windows 7 on an existing XP system it forces you to perform a custom installation thus you will lose all your settings, programs, etc. so its technically not a true upgrade.
Also note that Windows 7 installation upgrade versions cannot be installed on top of older versions of windows such as Windows 2000, Windows Me, or Windows 98. On the other hand an upgrade disc can be used to install on a system without an operating system however you will not be able to activate Windows 7 with the upgrade discs product key and will have to purchase a full version product key from microsoft.
Back To Topics
Microsoft Pre Installation Checklist:
Here is a Windows 7 pre installation checklist. These handy recommendations come from Microsoft and they may just help you avoid Window 7 installation problems.
1. Have your Windows 7 product key handy:
Your product key should be located on the Windows 7 installation disc holder within the Windows 7 package, or if you purchased and downloaded Windows 7 online from Microsoft you should have received your product key in a confirmation e-mail from Microsoft after purchase.
You can find your product key on your computer or on the installation disc holder inside the Windows package or in a confirmation e‑mail if you purchased and downloaded Windows 7 online. Below is a sample product key.
Windows 7 product key format: PRODUCT KEY: XXXXX-XXXXX-XXXXX-XXXXX-XXXXX
If you want further information check out this Microsoft product key webpage for examples of product key stickers.
2. Write down your computer name:
If your computer is currently connected to a network it is a great idea to write down the existing computer name before upgrading or installing Windows 7 just in case you end up needing it after the Windows 7 installation is complete.
This is less common for home users though if you have a network setup where other computers have existing shares setup to your machine this is going to be important so that the other computers on your network don’t have broken shares.
3. Back up your existing data:
It is always a good idea to backup your existing data to a backup media before performing a Windows 7 installation. External hard disks, USB memory keys, DVD and CD media, or a network folder make a great backup choice. Microsoft recommends that you use the Windows Easy Transfer to back up your files and settings. Check out the Windows Easy Transfer webpage if you want more information on this easy backup option.
4. Run Microsoft’s Windows 7 Upgrade Advisor:
The Windows 7 Upgrade Advisor will help find any potential compatibility issues with your computer's hardware, programs and devices. The Upgrade Advisor may locate potential problems with your configuration that may prevent you from installing Windows 7 successfully.
The Upgrade Advisor tool is a free download from Microsoft too so we recommend you run it if you are unsure if your hardware is compatible. Here is a direct link to the Windows 7 Upgrade Advisor webpage on Microsoft’s website.
5. Decide whether to install either the 32-bit or 64-bit version of Windows 7:
As mentioned earlier in this article, if you purchased the Windows 7 installation disc it will include both 32-bit and 64-bit versions of Windows 7. Of course your hardware will have to support 64-bit so take note of that.
If you download Windows 7 from the Microsoft Store, remember you will need to choose which version to download. If you need help deciding which OS version to install take a look at the 32-bit versus 64-bit Windows 7 frequently asked questions page. It should answer many of your Windows 7 32/64-bit questions.
6. Tweak Antivirus software:
If you are upgrading from an existing OS such as Windows Vista we recommend prior to upgrading to Windows 7 that you update your antivirus program definition file, run a full system scan to make sure there are no viruses on your current Windows installation, and finally uninstall the antivirus program.
Your existing Virus program may not port well over to Windows 7 for it may be incompatible, plus Anti Virus software is tightly integrated into the operating system making a transition to a new and different OS such as Windows 7 not always so smooth.
A Windows Vista upgrade with an existing virus program installed may transition over smooth since the Vista OS is pretty close to Windows 7 however we personally still like to remove antivirus software before performing any OS upgrade using an upgrade option as an installation choice.
After you install Windows 7 however, remember to install a fresh antivirus program immediately to protect yourself from potential threats. If you are performing a clean install of Windows 7 also remember to install an antivirus program that is compatible with Windows 7 as soon as possible.
7. Test your Internet connection:
It doesn’t hurt to make sure your Internet connection is working so that you can get the latest Windows 7 updates including security updates and driver updates immediately after Windows 7 is installed. Additionally this will allow you to register your version of Windows 7 with Microsoft after the OS installation is complete. If you do not have an Internet connection Windows 7 can still be installed however so this step can be ignored.
Back To Topics
How to install Windows 7 using the Upgrade option Step by Step:
In a nutshell the Upgrade option gives existing Windows Vista users the ability to keep their existing programs, settings, and files intact during the upgrade to Windows 7. To find out more specific details to which versions of Windows can be upgraded to Windows 7 check out the Upgrading Windows 7 FAQ.
Pre Installation Notes:
Step by Step guide to using the Windows 7 Upgrade Option:
Step 1: Boot your computer into your existing operating system. Using the Windows 7 upgrade option requires you to perform the upgrade from within your existing OS.
Step 2: If you downloaded Windows 7 from Microsoft simply browse to the installation file you downloaded and then double-click it to launch.
Step 3: If you have a Windows 7 installation disc simply insert the disc into your computer’s CD/DVD drive and normally the setup should start automatically. If it doesn't open up My Computer or Computer and then double-click your DVD drive to open the Windows 7 installation disc. Next simply double-click setup.exe.
Step 4: If you've downloaded Windows 7 installation files onto a USB flash drive or other external media plug the drive into your computer and setup should start automatically. If it doesn't start automatically open My Computer or Computer and double-click the drive containing the installation files to open it and finally double-click setup.exe.
Step 5: On the Install Windows page click install now.
Step 6: Once you reach the Get important updates for installation page, it is recommended that you get the latest updates to help make certain you perform a successful installation and to also help protect your computer from potential security threats. Note: You will need an active Internet connection to get installation updates.
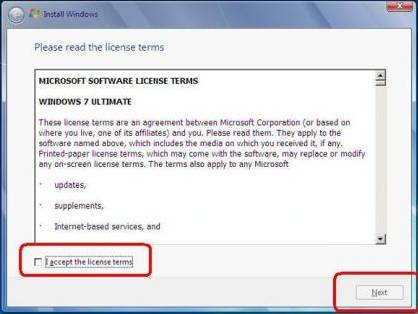
Step 7: Next you will reach the “Please read the license terms” page. You must accept the license terms to proceed. If you don’t like it sorry guys, Microsoft won’t let you proceed. Simply click I accept the license terms and then click next.
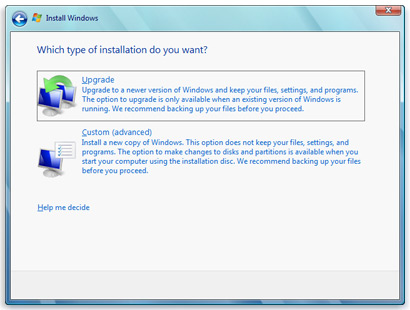
Step 8: On the “Which type of installation do you want?” page simply click Upgrade to begin the upgrade.
Note: If you are presented with compatibility report take note of what is reported for you may need this information. See sample Compatibility Report below.

Step 9: Finally all you have to do is follow the remaining instructions to complete the Windows 7 installation.
Notes: Using the Windows 7 upgrade option your chances of a successful installation are great, but do note that installation issues can occur when any old operating system is upgraded to a new OS so to be prepared we can’t stress enough that you backup your crucial data before performing a Windows 7 upgrade, or any OS upgrade for that matter.
Thankfully however the Windows 7 installation upgrade option as we mentioned has been much improved from older Windows installations and so success is most likely a few hard drive transfers away.
Post Installation Notes:
- Depending on your hardware configuration you may need to update drivers after the Windows 7 installation is complete to get all your hardware working successfully, e.g., your web camera or sound does not work on your computer. To do so simply click the Start button, then click All Programs, and finally click Windows Update. If Windows Update doesn't have the driver you need your computer or hardware/product manufacturer’s website is usually the next place we check. Also here are some direct links to Microsoft’s Update a driver for hardware that isn't working properly webpage and their Windows 7 Compatibility Center webpage. This also has more information that you will find useful when trying to track down Windows 7 drivers for your computer.
Back To Topics
How to install Windows 7 Via the Custom installation option without formatting your hard drive:
This Custom Windows 7 installation option will allow you to install a new copy of Windows 7 on a hard drive partition of your choice.
This custom option will erase your files, programs, and settings unlike the upgrade option so be sure to back up any files and settings you want to keep so that you can restore them after the Windows 7 installation is complete.
Remember you'll also need to reinstall all your programs once the Windows 7 installation is complete so make sure you have your installation discs or setup files for any programs you downloaded from the Internet handy.
This option is useful if you want the Windows installer to backup your old Windows Vista operating system already residing on the partition where Windows 7 is destined. Read further for more details.
Pre Installation Notes:
- If you're already running a 64-bit version of Windows such as Windows Vista 64-bit and plan to install a 32-bit version of Windows 7 take note that some programs that were designed to run only on a 64-bit operating system might not work properly under the 32-bit Windows 7 OS. Simply check your software manufacturer's website for more information, or as Microsoft recommends go to their Windows 7 Compatibility Center webpage to search for hardware and software tested to be compatible with both 32-bit and 64-bit versions of Windows 7.
- Windows Mail and Outlook Express are no longer included in Windows 7 so if you used those apps for email management you will need to install a new email client after Windows 7 is installed. This won’t be a problem for many of you for you may use web based email such as Google Gmail or Yahoo Mail, though for those of you who did use Outlook Express on Windows XP or Windows Mail on Vista go check out Microsoft’s Looking for Windows Mail webpage for information on their alternate Windows Live Mail option.
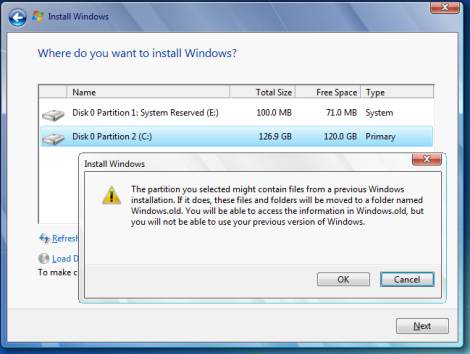
- If you choose this installation option and do not format your hard drive during the Windows 7 installation data files will be saved to a Windows.old folder on the partition you chose to install Windows 7 on. The Windows.old folder basically contains folders and files that were used in the earlier version of Microsoft Windows that was installed. Don’t rely on this to backup any data, always back up your files prior to any Windows 7 installation. After installation however if you've successfully backed up your data and are confident you didn’t miss anything, or you don’t ever plan on reverting back to your old version of Windows after Windows 7 has been installed feel free to delete the Windows.old folder if you want to free up some hard disk space. Of course a clean option which we will go over in the next section would be a better option for it formats your hard drive before you install Windows 7.
A closer look at Windows.old:
- Windows.old is the folder created by Windows when you choose a custom installation without formatting your hard drive. The Windows.old folder contains the files, folders and drivers from your previous windows installation. One key benefit of the Windows.old folder is that you can actually use it to restore Windows 7 to your previous version of Windows prior to Installation. Here’s our complete guide to Uninstall Windows 7, it shows you step by step how to restore to a previous version of Windows after the Windows 7 installation. Remember the Windows.old folder will only be created when you choose a custom installation without formatting your hard drive and additionally install Windows 7 on same drive where previous version of Windows was installed.
Step by step guide to install Windows 7 using the Custom option without formatting your hard drive:
Step 1: Boot into your computer and start Windows normally. If you downloaded Windows 7 from Microsoft browse to the installation file you downloaded and double-click it.
If you have a Windows 7 installation disc insert the disc into your computer and setup should start automatically. If it does not simply browse to My Computer or Computer and double-click your CD/DVD drive letter to open the Windows 7 installation disc and finally double-click setup.exe.
If you've downloaded Windows 7 installation files onto a USB flash drive or other external media plug the drive into your computer and setup should start automatically. If it doesn't start automatically open My Computer or Computer and double-click the drive letter containing the installation files to open it and finally double-click setup.exe.
Step 2: On the Install Windows page simply follow any instructions displayed and then click Install now.
Step 3: If you have an active Internet connection it is best to get the latest updates so when presented with the Get important updates for installation page go ahead and proceed to download them.
Step 4: On the Please read the license terms page go ahead and accept the license terms and click next.
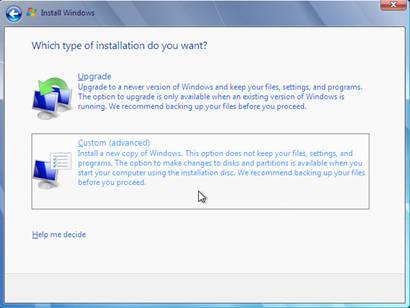
Step 5: On the “Which type of installation do you want?” page go ahead and choose the Custom option.
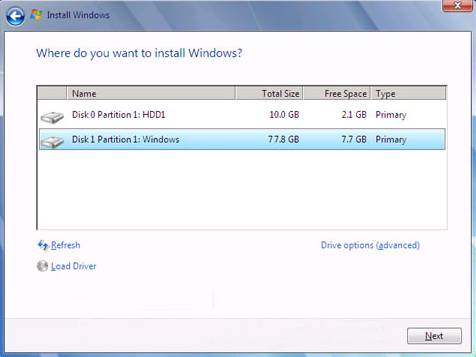
Step 6: On the Where do you want to install Windows page go ahead and choose the partition containing your previous version of Windows and then click Next.
Step 7: When presented with the Windows.old dialog box, click OK.
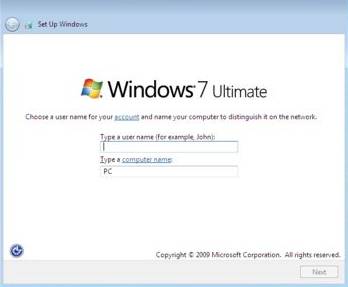
Step 8: Finally all you have to do is follow the remaining instructions to complete the Windows 7 installation including naming your computer and setting up an initial user account.
Post Installation Notes:
- Depending on your hardware configuration you may need to update drivers after the Windows 7 installation is complete to get all your hardware working successfully, e.g., your web camera or sound does not work on your computer. To do so simply click the Start button, then click All Programs, and finally click Windows Update. If Windows Update doesn't have the driver you need your computer or hardware/product manufacturer’s website is usually the next place we check. Also here are some direct links to Microsoft’s Update a driver for hardware that isn't working properly webpage and their Windows 7 Compatibility Center webpage. This also has more information that you will find useful when trying to track down Windows 7 drivers for your computer.
Back To Topics
How to format your hard drive and perform a clean install of Windows 7 Via the Custom installation option:
You also have the ability with a Custom Windows 7 installation to start from scratch and format your hard drive to erase it entirely before installing Windows 7.
This option differs in that it will permanently erase everything on the partition that you are formatting including your files, settings, and programs. With this option a Windows.old folder will not be created as it was in the option before. This is the case because we didn’t format the hard drive before but installed on a partition where another OS already resided, thus the Windows installer backed up the old OS.
We personally like to perform a clean install of windows for a clean install of any new OS is always well clean!
Like any OS install or upgrade back up any files and settings you want to keep so that you can restore them after the installation is complete. You will need to reinstall your programs so make sure you have the installation discs or setup files for the programs you want to use in Windows 7.
Pre Installation Notes:
- When using an upgrade version of Windows 7 do not use a 3rd party program from another software manufacturer to reformat your hard disk before installing Windows 7. Follow this guide for the proper installation method.
- Remember Windows Mail and Outlook Express are no longer included in Windows 7 so if you used those apps for email management you will need to install a new email client after Windows 7 is installed. This won’t be a problem for many of you for you may use web based email such as Google Gmail or Yahoo Mail, though for those of you who did use Outlook Express on Windows XP or Windows Mail on Vista remember to check out Microsoft’s Looking for Windows Mail webpage for information on their alternate Windows Live Mail option.
- If you're already running a 64-bit version of Windows such as Windows Vista 64-bit and plan to install a 32-bit version of Windows 7 take note that some programs that were designed to run only on a 64-bit operating system might not work properly under the 32-bit Windows 7 OS. Simply check your software manufacturer's website for more information, or as Microsoft recommends go to their Windows 7 Compatibility Center webpage to search for hardware and software tested to be compatible with both 32-bit and 64-bit versions of Windows 7.
Step by step guide to formatting your hard drive and installing Windows 7 using the Custom option:
Step 1: To format your hard disk during Windows 7 installation you will need to start or boot your computer using the Windows 7 installation media such as the Windows 7 installation disc or USB flash drive. Most of you will be using a disc, so go ahead and put your Windows 7 disc in your computers CD/DVD drive for you will need to restart or turn on your system with the disc in the drive.
Make sure your computers BIOS is set to boot from CD, most modern day computers are setup this way. If your computer doesn’t boot from the disc and you are unsure on how to set this option consult your computer manufacture or email us and we’d b happy to help you. Also Microsoft’s Start your computer from a Windows 7 install disc or USB flash drive guide is a great place for beginners.
Step 2: After turning on your system with the CD in the drive go ahead and press any key when prompted during your computer POST routine and then follow the instructions presented on screen. If you don’t see this go back to step 1 to setup your BIOS to boot from CD or USB flash drive depending on your installation media.
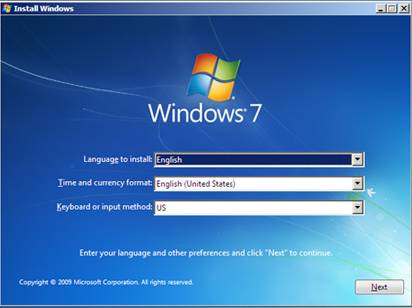
Step 3: On the Install Windows page simply enter your preferences and click next.
Step 4: Accept the Windows 7 license agreement.
Step 5: Select Custom (advanced) installation on the “Which type of installation do you want?” page.
Step 6: Select Drive options (advanced) on the “Where do you want to install Windows?” page.
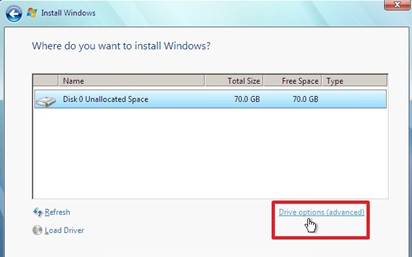
Step 7: Select the partition that you want to change, choose the formatting option you want to perform and then follow the instructions presented. If you need help with this feel free to email us but for the most part it is pretty straight forward.
Simply highlight the partition you want to format or delete, and click a respective button as shown in the screenshot below. For example, if you delete a partition altogether it will show as unallocated space, and then with that unallocated space you can simply click the “New” button to allocate space.
When allocating space choosing the default MB size for your drive is typically the best for most users since you want to take full advantage of all your disk space. After this you can click the Format button to get the drive ready to accept the Windows 7 OS.

Step 8: Once you allocated space, selected a partition, and formatting is complete simply click next and then follow the remaining instructions to finish installing Windows 7 including naming your computer and setting up an initial user account.
Post Installation Notes:
- If you used an upgrade version of Windows 7 on a computer without a previous Windows operating system already installed you may not be able to activate the installation. Remember the upgrade version requires Windows XP or Windows Vista to be installed on the computer to activate Windows 7. Basically during the Windows 7 setup you will need to leave the product key box empty and to activate Windows 7 you will want to go to the Microsoft Support website for options. Microsoft recommends you check out their Windows 7 activation error: invalid product key and the Windows 7 activation error: 0xC004F061 webpage for additional information. Note: These recommendations are straight from Microsoft.
- Depending on your hardware configuration you may need to update drivers after the Windows 7 installation is complete to get all your hardware working successfully, e.g., your web camera or sound does not work on your computer. To do so simply click the Start button, then click All Programs, and finally click Windows Update. If Windows Update doesn't have the driver you need your computer or hardware/product manufacturer’s website is usually the next place we check. Also here are some direct links to Microsoft’s Update a driver for hardware that isn't working properly webpage and their Windows 7 Compatibility Center webpage. This also has more information that you will find useful when trying to track down Windows 7 drivers for your computer.
Back To Topics
How to use the Windows 7 Custom installation option when no operating system is installed:
Step by step guide to install Windows 7 on a computer without an operating system:
Step 1: Start your computer with the Windows 7 installation media in your CD/DVD drive, or with your USB flash drive containing the Windows 7 installation plugged in. Make sure your computers BIOS is set to boot from CD or from a USB drive. Many modern day computers are setup to boot from CD out of the box.
If your computer doesn’t boot from the disc or your USB memory stick and you are unsure on how to set this option consult your computer manufacture or email us and we’d b happy to help you. Also Microsoft’s Start your computer from a Windows 7 installation disc or USB flash drive guide is a great place for beginners.
Step 2: After turning on your system with the CD loaded or USB flash drive plugged in proceed to press any key when prompted during your computer POST routine and then follow the instructions presented on screen. If you don’t see this go back to step 1 to setup your BIOS to boot from CD or USB flash drive depending on your installation media.
Step 3: On the “Install Windows page” simply enter your preferences and click next.
Step 4: Accept the Windows 7 license agreement.
Step 5: Select Custom (advanced) installation on the “Which type of installation do you want?” page.
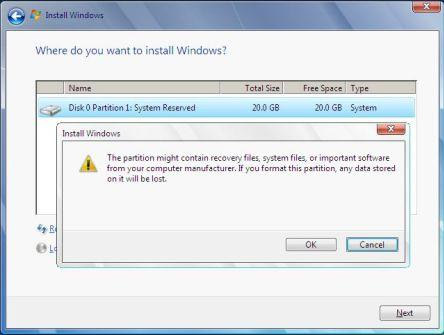
Step 6: On the “Where do you want to install Windows” go ahead and choose an available partition to install Windows 7 on or choose Unallocated Space if no partitions are listed.
If you are presented with a dialog box stating “Windows might create additional partitions for system files” go ahead and click ok.

If you receive the message that “your partition might contain recovery files or other types of files from your computer manufacturer” most likely your computer manufacturer setup this partition as a recovery partition or to hold system diagnostic tools.
If there are multiple partitions you may have selected the wrong one so just take a look at the various partitions and their respective size. Typically a manufactuer recovery partition will be smaller than another partition or any unallocated space on the drive. If there are no other partition available however go ahead and click ok.
Step 7: Complete the Windows 7 installation by following any remaining Windows 7 installation instructions. This includes naming your system and setting up your initial user account.
Post Installation Notes:
- If you used an upgrade version of Windows 7 on a computer without a previous Windows operating system already installed you may not be able to activate the Windows 7 installation. During the Windows 7 setup you will need to leave the product key box empty and to activate Windows 7 you will want to go to the Microsoft Support website for options. Microsoft recommends you check out their Windows 7 activation error: invalid product key and the Windows 7 activation error: 0xC004F061 webpage for additional information.
- Depending on your computers configuration you may need to update drivers after the Windows 7 is installed, especially if some of your hardware isn’t working, e.g., your web camera, scanner or printer does not work on your computer. To do so simply click the Start button, then click All Programs, and finally click Windows Update. If Windows Update doesn't have the driver you need your computer or hardware/product manufacturer’s website is usually the next place you should check. Also check out Microsoft’s Update a driver for hardware that isn't working properly webpage and their Windows 7 Compatibility Center webpage. These links should further help you tack down Windows 7 drivers for your computer if needed.
Back To Topics
See also:
Return
from Windows 7 Installation Guide to Home Page
Contact us | View site map
| 