How To Uninstall Windows 7
How-to uninstall Windows 7 on multiboot configurations or on systems with Windows.old
In this guide we are going to offer you two methods to manually restore your computer back to a previous Windows installation before Windows 7 was installed. This guide is applicable if you installed Windows 7 as a new installation on top of an earlier version of Windows such as XP or Vista or if you installed Windows 7 in a multiboot configuration.
If you used the Windows 7 installation disc or files to install Windows 7 on the same hard drive that had Windows XP, Vista, or another version of Windows 7 on it and your system has the Windows.old folder our first tutorial will work for you.
If your system doesn’t have the Windows.old and you want to revert to your old operating system this guide will not work and you will have to instead perform a custom/clean installation of your old OS, unless of course you installed Windows 7 as a secondary operating system in a multiboot configuration. If this is the case our second tutorial will work for you.
The first tutorial is for those of you who installed Windows 7 on the same hard drive containing an older Windows OS and the Windows 7 installation created the Windows.old folder which contains your previous operating system, settings, and personal data as it were before installing Windows 7.
This Windows.old folder will only have been created if you chose a custom installation without formatting your hard drive and additionally you installed Windows 7 on same drive where your previous version of Windows was installed. However if you installed Windows 7 over Windows Vista using the upgrade option, you cannot revert back to Windows Vista because the Windows.old is not created when you use this upgrade option installation method. See our Windows 7 installation guide for more details on Windows.old and installing Windows 7.
Reverting to the previous operating system using Windows.old will restore your computer back to the previous Windows installation right before Windows 7 was installed. Do note that if you do revert to a previous operating system by using the Windows.old folder you will lose any new files or settings on the new/current Windows 7 installation so if you’ve added anything since installing Windows 7 and before you perform the steps in this tutorial, make sure you back your data up to an external media for new data/settings will be lost.
To verify if our first tutorial applies to you simply browse to the root of the Windows partition and look for the Windows.old folder.
If you have a Windows.old folder and you have some basic understanding of the command prompt, this tutorial is going to be pretty straightforward. If you aren’t too familiar with the command prompt don’t worry, we walk you through the steps and if you have any questions you can always contact us anytime.
Our second tutorial is for those of you who setup Windows 7 as a secondary OS to a primary Windows XP or Vista OS in a multipboot configuration. We will go over every detail in this second tutorial to show you exactly how to uninstall Windows 7 in a multiboot configuration.
We hope you find our handy guide to unintall windows 7 useful, please don't hesitate to contact us anytime with questions!
Tutorial 1: Uninstall Windows 7 using Windows.old
Step by Step Guide To Uninstall Windows 7 using Windows.old
Step 1:
First you need to determine if there is a Windows.old folder and you also need to verify that you have enough free disk space on the hard drive containing the Windows installations.
- Click Start and then click Computer
- Now note how much space is available for your C: drive under the Hard Disk Drives area for you need to know if you have enough hard disk space available for the restore.
- Next double click on your C: drive and look for the Windows.old folder to see if it exists. If the Windows.old folder doesn’t exist this tutorial will not work for you but if it does proceed to the next step.
- Now Right click the Windows.old folder and choose properties. After a few seconds Windows 7 will show you the size of the folder.
- Make sure the Windows.old folder is smaller than the amount of free space on your C: drive. If the Windows.old folder is twice as big as the free space available on your C: drive you might not be able to successfully restore your old Windows installation.
Step 2:
Next you will need to start your computer and launch the Windows Recovery Environment
- Put your Windows 7 installation disc in your CD/DVD drive and restart your computer.
- Press any key once prompted to boot from the disc.
- In the Install Windows window go ahead and select a language, time, etc. and then click next.
- Now within the Install Windows window click Repair your computer.
- In the System Recovery Options window click the Windows 7 operating system version that you want to repair and then click next.
- Finally in the System Recovery Options window go ahead and click Command Prompt to launch the command prompt window.
Step 3:
Now you will need to move the Windows 7 folders to a newly created folder. In this example we create a folder called Win7old
Instructions: Type the following 8 commands one by one, pressing enter after each command: If during any of the proceeding commands you receive a “The system cannot find the file specified” error don’t worry, simply ignore the message and continue through each proceeding command.
- C:
- Md Win7old
- Move Windows Win7old\Windows
- Move "Program Files" "Win7old\Program Files"
- Move Users Win7old\Users
- Attrib –h –s –r ProgramData
- Move ProgramData Win7old\ProgramData
- Rd "Documents and Settings"
Step 4:
Next you need to copy or move the contents of the Windows.old folder
Instructions: Type the following 5 commands one by one, pressing enter after each command: If during any of the proceeding commands you receive a “The system cannot find the file specified” error don’t worry, simply ignore the message and continue through each proceeding command.
- move /y c:\Windows.old\Windows c:\
- move /y "c:\Windows.old\Program Files" c:\
- move /y c:\Windows.old\ProgramData c:\
- move /y c:\Windows.old\Users c:\
- move /y "c:\Windows.old\Documents and Settings" c:\
Step 5:
Now you must restore the boot sector for your previous Windows installation
Instructions: Type one of the following commands at the command prompt depending on your particular operating system configuration: In the following example D: represents our CD/DVD drive letter, but if your computer’s CD/DVD drive letter is different use that letter in the command instead of course.
If your previous Windows operating system was Windows XP, Windows 2000 or Windows Server 2003 type this command and press enter:
- D:\boot\bootsect /nt52 c:
If your previous operating system was Windows Vista type this command and press enter.
- D:\boot\bootsect /nt60 c:
Step 6:
If your old operating system was either Windows XP or Windows 2000/2003 you now must restore the Boot.ini file. This step does not apply to Windows Vista systems.
Instructions: Type the following 2 commands at the command prompt, pressing enter after each command:
- Attrib –h –s –r boot.ini.saved
- Copy boot.ini.saved boot.ini
Step 7: Final Uninstall Windows 7 Step
In this final step you simply need to close the command prompt and restart your computer.
Instructions: Follow these final 2 steps to restart your computer:
- Type exit at the command prompt window
- Click Restart to restart your computer.
Post Uninstall Windows 7 Notes:
If you've completed the requirements in this uninstall Windows 7 tutorial and everything was successful, feel free to delete the Win7old folder that you created in step 3. This will free up some disk space on your hard drive, but do make sure you backed up any data from the folder before deleting it.
We hope our tutorial to uninstall Windows 7 was useful, if you have any questions feel free to use our contact form anytime.
Tutorial 2: Uninstall Windows 7 on Multiboot configuration
Step by Step Guide To Uninstall Windows 7 on a multiboot configuration
In multiboot configurations where Windows 7 was installed as a secondary operating system to an earlier version of Windows such as Windows Vista or Windows XP, you may be able to easily remove Windows 7 from the computer.
This really depends on how your multiboot configuration was initially setup. For example this tutorial will only work if the old version of Windows was installed prior to Windows 7. This tutorial will not work if you installed Windows 7 first and then installed Windows Vista or Windows XP afterwards to create a multiboot environment.
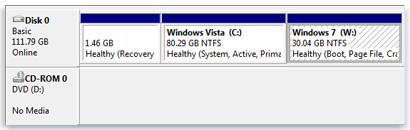
In this tutorial we are going to show you exactly how to uninstall Windows 7 in a multiboot setup. We will show you how to format/delete the partition containing Windows 7 so that your earlier operating system can reclaim the disk space.
Here is an example of a multiboot disk configuration with Windows Vista and Windows 7 installed on separate partitions. NOTE: In this example it is safe to delete Windows 7.
Uninstall Windows 7 Pre Removal Notes:
- Backup all your data, programs, etc. from your Windows 7 installation before you begin.
- Do not delete the earlier version of Windows in multiboot configurations for this might mess up your computer since the computer uses startup files from the first version of Windows that was installed. You may want to check out these Microsoft pages on multibooting if you are new to multiboot configurations: Install more than one operating system (multiboot) & Can I have more than one operating system on my computer (multiboot)?
- Remember, if you installed Windows 7 prior to installing another secondary version of Windows such as Vista or XP, do not delete Windows 7. This tutorial is only for those situations where Windows 7 was installed on a separate partition or disk following an older version of Windows not prior. See screen shot above for an example of a multiboot configuration where it is safe to remove Windows 7
Step by Step Instructions to Uninstall Windows 7:
To begin start your computer and then make sure you boot into the earlier version of Windows to perform the following steps.
Step 1:
Open Computer Management. If you are running Windows XP the fastest way to access computer management is to right-click on My Computer and then choose manage. In Vista right-click on Computer and choose manage. You can also browse through control panel and access it in the Administrative Tools folder or in Vista even type computer management in the start menu instant search box.
Step 2:
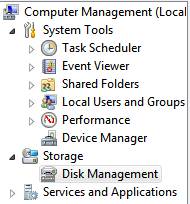
Once in Computer Management browse to the left pane and under the Storage section choose Disk Management.
Step 3: Uninstall Windows 7
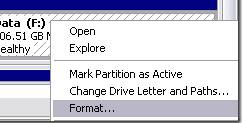
Right click the partition that Windows 7 is installed on and then select format from the menu. Formatting the volume with default settings should be fine for most users so in the Format dialog box simply click ok and then click ok again. Note: Use quick format. It is must faster since only a new file table will be created instead of it having to fully erase everything which can take some time to complete.
Step 4: Uninstall Windows 7
Finally you may have to remove the boot entry reference to the Windows 7 operating system. Even though we deleted the Windows 7 partition we still need to tell the computer that it no longer exists. This step will prevent the multiboot selection screen from appearing every time you start your computer. Vista users can do it via the msconfig utility, XP users will need to edit the boot.ini file.
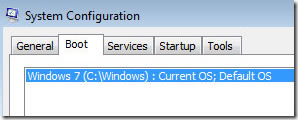
For Windows Vista:
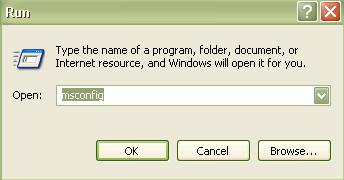
- Click Start and then type in the run or search box msconfig.
- Once in the system configuration utility choose the boot tab, highlight the listing for Windows 7, and then click the delete button. Now click ok to exit the system configuration utility and finally restart your computer.
For Windows XP:
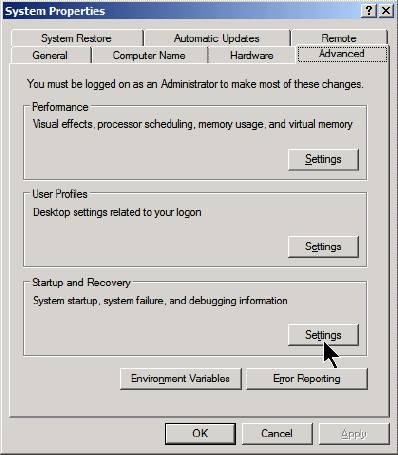
- Right click My Computer and then choose Properties.
- Next click on the advanced tab and then choose Settings button under Startup and Recovery portion.
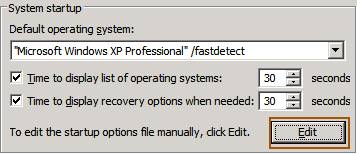
- Now click on the Edit button under System startup to launch the boot.ini file in textpad.
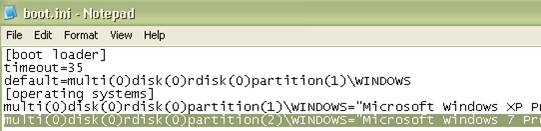
- Highlight the line containing the reference to the Windows 7 operating system and delete it. Now exit and save the boot.ini file and then reboot your computer.
See also:
Return
from Uninstall Windows 7 to Home Page
Contact us | View site map
| 